Project & Import
Based on XMapTools 4.5 embedded documentation
This page describes the tools available in the Project & Import workspace. Each section is described separately below.

Figure 1: Project & Import tools in XMapTools.
1. Project
The progress of a session can be saved to a project file (*.mat) and restored later. All current data and settings will be saved. Project files are generally compatible with all new versions of XMapTools. Project management tools described in the following are available in the Project & Import workspace or from the File menu.
- The Open (Open Project)
 button opens and loads an existing project in XMapTools. The first map available in Intensity is automatically selected. The current working directory is automatically changed to the location of the project file.
INFO
XMapTools 4 uses a different strategy for internal data organisation and storage. Projects created with previous versions of XMapTools are not compatible with the new format and a conversion step is required. When a project file created with XMapTools 3 is opened in XMapTools 4, an automatic conversion to the new format is performed. Further explanation can be found here.
The Save (Save Project)
 button saves the active project as a MATLAB M-file containing all variables used by XMapTools. If no project has been saved, a new project will be saved.
The Save Project As...
 button saves the active project as a new MATLAB M-file.
 Display the name or the full path of the active project (if saved) depending on the selected option in the dropdown menu (File or Path).
TIP
Remember that the current working directory changes automatically when a new project file is opened. It is also possible to change the working directory using the main menu: XMapTools > Set Working Directory.
2. Data Conversion
Several tools are available to convert raw data into an XMapTools-friendly format and generate mosaics.
Raw data conversion using a converter
- The Open XMapTools' EPMA converter
 button opens the converter for EPMA data. A description on how to convert EPMA maps is available in the EPMA documentation.
Data formats currently supported:
EPMA - JEOL (SUN) – JEOL microprobes running on SUN-OS
EPMA - JEOL (WIN) – JEOL microprobes running on WINDOWS
EPMA - CAMECA – for recent CAMECA microprobes
The Open XMapTools' LA-ICP-MS converter
 button opens the converter for LA-ICPMS data. A detailed description of how to convert LA-ICP-MS data can be found in the LA-ICP-MS documentation.
Building mosaics
XMapTools can combine maps to create mosaics. There are two types of mosaic: grid mosaic, where the maps are stitched together in a grid, and real mosaic, where the maps are merged in the same coordinate system.
Grid mosaic
- The Generate Mosaic (Grid)
 button allows multiple maps to be stitched together in a grid. Such a mosaic allows maps of individual grains to be combined on a single image, improving the visualisation of possible variations in composition. The original coordinates of each map are not preserved. Spot analyses used as internal standards must have X and Y manually defined after the mosaic has been created using the XMapTools coordinate system. For an alternative option, see the real mosaic option below.
How to create a mosaic using a predefined grid:
- From the main menu, set the working directory to a directory containing a folder called Mosaic (case sensitive): XMapTools > Set Working Directory
- The Mosaic folder should contain a set of maps with the same elements in the same format (e.g. TXT or CSV, not a combination of the two). Each dataset must be stored in a separate subfolder and already be in the XMapTools format after conversion from the raw data. Note that the subfolder name is used to define the order of the maps in the mosaic. Use folder names such as
01_Map34,02_Map4,03_Map1to define the order before importing - If the name of a folder starts with a minus sign (
-), the folder will be skipped and not imported when the mosaic is created - Important: The maps must have the same spatial resolution. If a map has a different spatial resolution, the resolution must first be adjusted manually. XMapTools assumes that the maps have the same spatial resolution and does not check this during mosaic creation
- Press the Generate Mosaic (Grid) button
- Define the number of columns in the dialogue box
- XMapTools creates the mosaic and saves the new maps in the current working directory
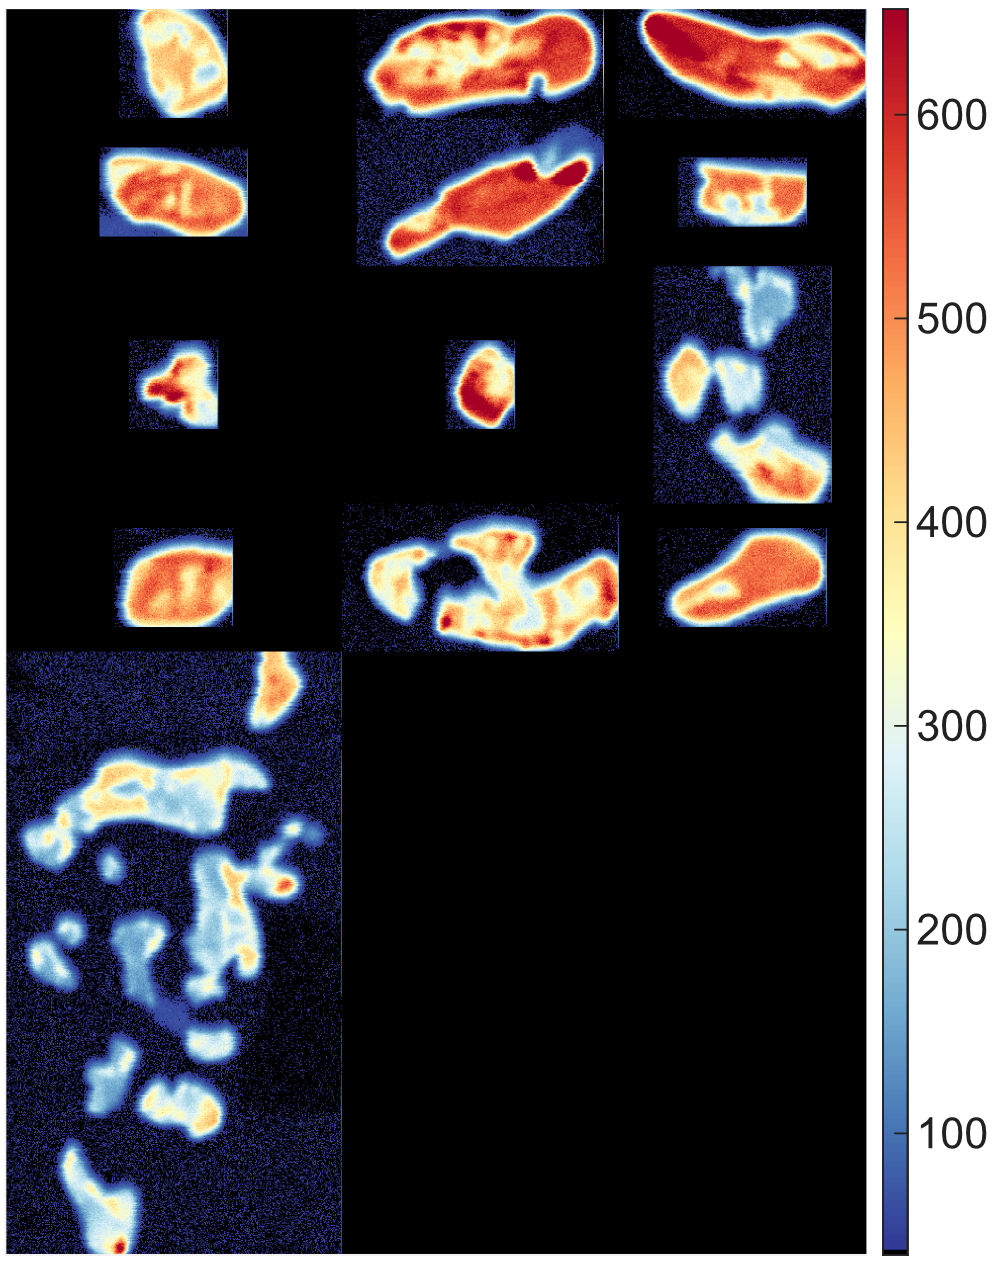
Figure: This is an example of a mosaic grid for 13 maps, arranged in three columns (map: Pb in counts). This allows the maps to be merged and displayed with the same colour scale.
Real mosaic
- The Generate Mosaic in Original Coordinate System
 button merges several maps into a referenced system based on their original coordinates. It also calculates the coordinates of the new map for the Standards.txt file. This means that spot analyses obtained during the same probe session can be provided directly and used to calibrate the mosaic.
How to create a referenced mosaic:
- From the main menu, set the working directory to a directory containing a folder called Mosaic (case sensitive)
- The Mosaic folder should contain a set of maps with exactly the same elements. Each set must be stored in a separate subfolder. Note that the subfolder name is used to define the order of the maps in the mosaic. Use folder names such as
01_Map34,02_Map4,03_Map1to define the order before importing. Each folder must contain a Standards.txt file containing the map coordinates. If a Classification.txt file exists, it will be skipped - The spatial resolution of each map is automatically adjusted to the settings of the map with the higher spatial resolution. Resampling is done using a linear interpolator for raster data
- Press the Generate Mosaic in Original Coordinate System button
- XMapTools creates the mosaic, saves the maps to the working directory, creates a file Standards.txt containing only the first block with the map coordinates. The order of the oxides (second block) and the analyses (third block) must be added manually
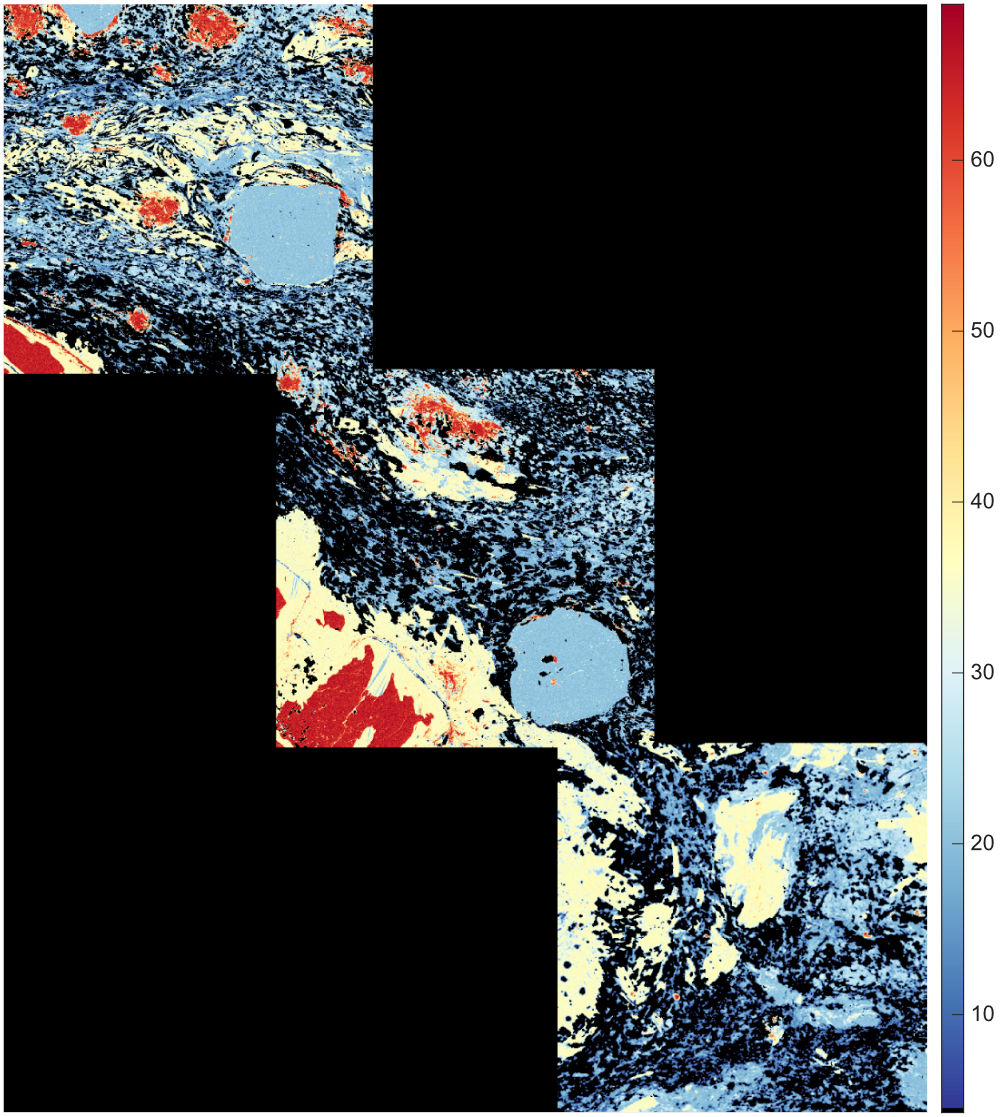
Figure: This is an example of a real mosaic for 3 maps, arranged using the map coordinates (map: Al2O3 in wt%).
3. Importing Maps & Images
This section describes the tools available for importing maps and other images into XMapTools. See also the dedicated Import Maps Tool documentation.
- The Import (Import Maps)
 button opens the Import Tool to load map data.
Format: Map files must have the extension *.txt, *.asc, *.dat or *.csv, no header and a name compatible with the default element names of XMapTools for identification.
- The Import CT (Import Image Stack)
 button imports slice images obtained after reconstruction of CT data. Compatible image formats are
 *.jpgand*.png. It is recommended to select the files from the last one to the first one while pressing MAJ. Importing large datasets can take several minutes.
4. Options (Project)
This section describes the display options for the map being viewed. These options are saved for each project.
 Set the map resolution corresponding to the pixel size, also known as the step size on EPMA instruments. The default value is 20µm (arbitrary). The resolution value is automatically calculated from the map coordinates defined in Standards.txt when internal standards (spot analyses) are imported.
 Activate and display the scale bar using the pixel size defined in Resolution. Two options are available from the drop down menu: white (default) or black.
The Rotate view by 90°
 button can be used to adjust the orientation of the map. The rotation angle is displayed next to the button with possible values: 0 (default orientation), 90, 180 or 270. Note that some of the display features, such as drag-for-zoom, are not available when a rotation is applied.